How to Start Watercolor Painting as a Beginner: A Simple First Guide
Watercolor painting looks almost effortless when you watch someone who knows what they're doing. A little water, a few brushstrokes, and suddenly there's a beautiful landscape on the page.
Then you try it yourself.
The paint spreads too far. Your colors turn muddy. The paper starts curling. And the lovely little painting you imagined looks nothing like the one in the tutorial.
That's normal.
Watercolor is a wonderfully approachable hobby, but it behaves differently from pencils, markers, or acrylic paint. Instead of controlling every mark, you learn to work with water, pigment, and a little unpredictability.
The good news? You don't need drawing skills, expensive supplies, or hours of free time to get started.
This guide will walk you through what to buy, how to use your materials, five simple techniques, and a first painting you can complete in one relaxed session.
Is Watercolor Painting Hard for Beginners?
Watercolor is easy to start, but it takes practice to control.
Unlike opaque paints, watercolor is usually transparent. The white of your paper helps create the lighter areas of your painting, while additional layers of color can make other areas darker.
Water also changes how the paint behaves. A brush loaded with water produces a very different mark from one carrying mostly pigment.
That's what makes watercolor interesting.
You don't have to master everything before enjoying it. Even simple washes, loose flowers, and small landscapes can look beautiful.
If you've been looking for a creative hobby that doesn't require much space, watercolor painting is a lovely place to begin.
And if you feel nervous about making art, remember this:
Your first watercolor painting doesn't need to be good. It only needs to help you discover what the paint can do.
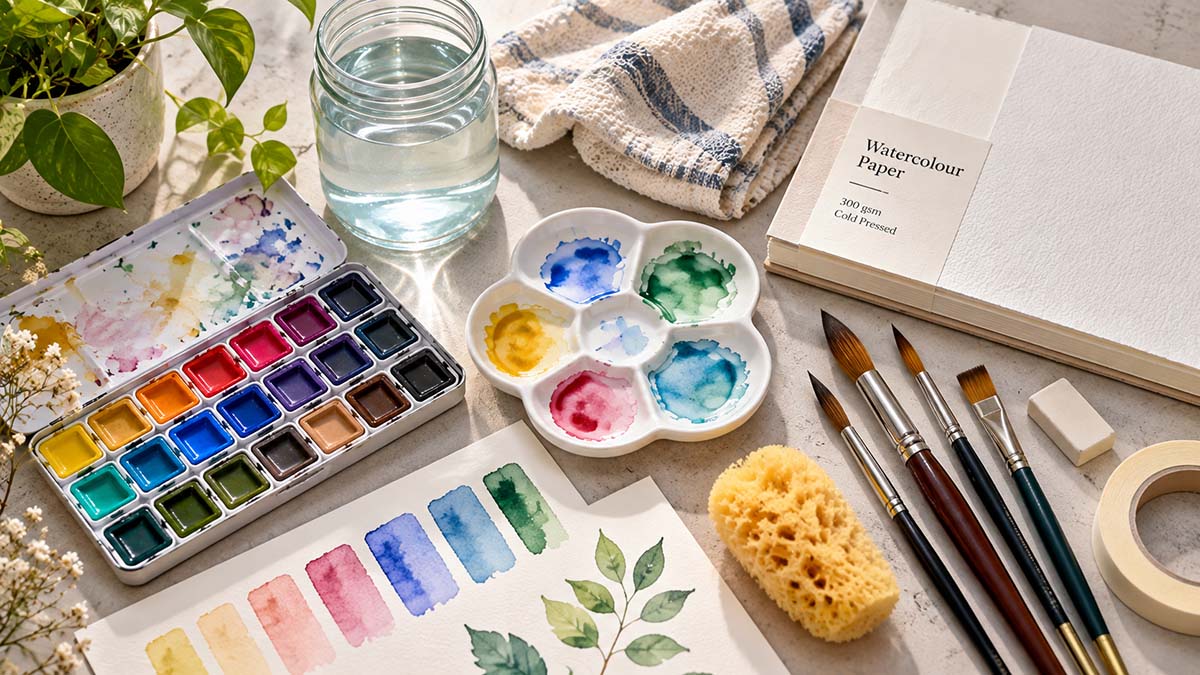
1. What Supplies Do You Actually Need?
Walk into an art store and you'll find dozens of paint sets, brushes, papers, palettes, and accessories.
You don't need most of them.
Start with a few dependable basics. Once you've painted several times, you'll have a much better idea of what you enjoy and which supplies are worth upgrading.
Watercolor paints
Watercolor paints generally come in two beginner-friendly forms:
Pans: Small blocks of dried paint that you activate with a wet brush. They're compact, tidy, and convenient for occasional painting.
Tubes: Soft paint that you squeeze onto a palette. They're useful when you want to mix larger amounts of color, but they aren't necessary for your first few paintings.
A small set of around 6–12 colors is enough to begin.
You don't need 48 shades. Learning to mix a few colors will teach you more than owning a huge collection.
Watercolor paper
If there's one supply worth paying attention to, it's the paper.
Ordinary printer paper absorbs water poorly and often buckles, pills, or tears when you try to paint on it.
Look for paper specifically labeled watercolor paper.
For a comfortable starting point:
Weight: Approximately 300 gsm (140 lb) is a popular, sturdy option.
Surface: Cold-pressed paper has a lightly textured surface that works well for many beginner techniques.
Size: A5, 5 × 7 inches, or 9 × 12 inches gives you plenty of room without feeling overwhelming.
Lighter watercolor paper can work, but it may buckle more noticeably when wet.
You don't need the most expensive cotton paper. A student-grade watercolor pad is fine for learning.
Brushes
Start with two brushes rather than a complicated set.
Medium round brush: For washes, leaves, petals, and general painting.
Small round brush: For finer lines and details.
A synthetic watercolor brush is an affordable starting choice. It should hold water reasonably well and come to a useful point.
A few household essentials
You'll also need:
A container of clean water
A small plate or watercolor palette for mixing
A paper towel or clean cloth
A pencil and eraser for light sketches
A flat, protected work surface
That's enough to start.
Your simple beginner supply checklist
Supply | What to look for |
|---|---|
Paint | Small pan set or a few tubes |
Paper | Watercolor paper, ideally around 300 gsm |
Main brush | Medium synthetic round |
Detail brush | Small round |
Palette | Mixing tray or white ceramic plate |
Extras | Water, cloth, pencil, eraser |
2. Understand How Watercolor Paint Works
Before trying to paint a picture, spend a few minutes experimenting.
Watercolor becomes much easier to understand when you stop thinking about it as ordinary paint and start noticing how pigment and water interact.
More water means lighter color
Mix a little paint with plenty of water.
Brush it across your paper.
You'll see a pale, transparent color.
Now add more pigment to the mixture and try again.
The color should appear stronger and more saturated.
This is one of the most important watercolor skills: learning how much water and pigment to put on your brush.
Wet paper changes everything
Paint on dry paper and you'll usually get a more defined brushstroke.
Paint on damp paper and the pigment spreads into the moisture, often creating soft edges and unexpected shapes.
Neither effect is better.
They simply produce different results.
Watercolor often dries lighter
Many watercolor mixtures appear darker while wet than they do after drying.
Before deciding that your painting needs another layer, allow the first one to dry and look at it again.
White areas need planning
Traditional transparent watercolor relies heavily on the paper showing through.
If you want a bright white cloud or a tiny highlight, it's often easiest to leave that area unpainted from the beginning.
You can also use techniques such as lifting or masking, but those can wait until you're more comfortable.
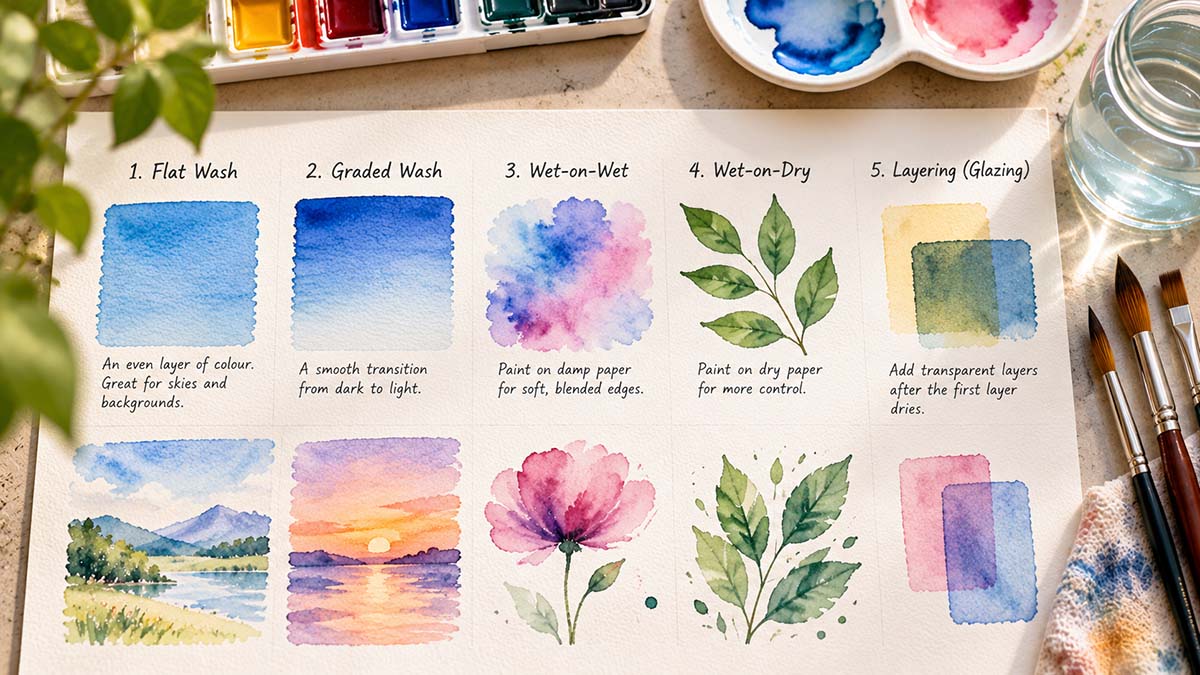
3. Five Essential Watercolor Techniques for Beginners
You don't need dozens of techniques to create your first painting.
These five will give you a useful foundation.
Take a spare sheet of watercolor paper, divide it into small practice areas, and experiment with each one.
Technique 1: Flat wash
A flat wash is an area of relatively even color.
Try it:
Mix a small puddle of diluted paint.
Load your brush.
Paint a horizontal stroke.
Add the next stroke just beneath it while the edge remains wet.
Continue until you've filled a small rectangle.
Try to keep the amount of pigment consistent.
Flat washes are useful for skies, simple backgrounds, and large areas of color.
Technique 2: Graded wash
A graded wash gradually changes from dark to light.
Try it:
Start with a fairly strong color mixture.
Paint a horizontal stroke.
Add a little clean water to your brush or mixture.
Continue downward with progressively lighter strokes.
Let the wash dry naturally.
This technique is especially useful for skies and soft atmospheric backgrounds.
Technique 3: Wet-on-wet
Wet-on-wet means applying watercolor to a surface that's already damp.
Try it:
Paint a small area with clean water.
While the paper is still shiny with moisture, touch your loaded brush to it.
Watch the color spread.
Add a second color and notice how the pigments meet.
The wetter the surface, the more freely the pigment may move.
Wet-on-wet is excellent for clouds, loose flowers, and dreamy backgrounds.
Technique 4: Wet-on-dry
Wet-on-dry means applying wet paint to dry paper.
Try it:
Make sure your paper is completely dry.
Load your brush with color.
Paint a simple leaf or curved line.
Observe the more defined edges.
This is useful when you want greater control over shapes.
Technique 5: Layering or glazing
Glazing involves painting a transparent layer over a previously dried layer.
Try it:
Paint a light yellow square.
Allow it to dry completely.
Paint a transparent blue wash across part of the square.
Notice how the overlapping colors interact.
The result depends on the pigments you use.
Important: Don't scrub repeatedly over a drying layer. That can disturb the pigment underneath and create muddy or damaged areas.
A quick practice exercise
Before your first painting, spend about 15 minutes making:
Three flat washes
Two graded washes
A few wet-on-wet color blooms
Five wet-on-dry leaves
One small glazing experiment
Don't judge the results as artwork.
Think of them as getting acquainted with your materials.
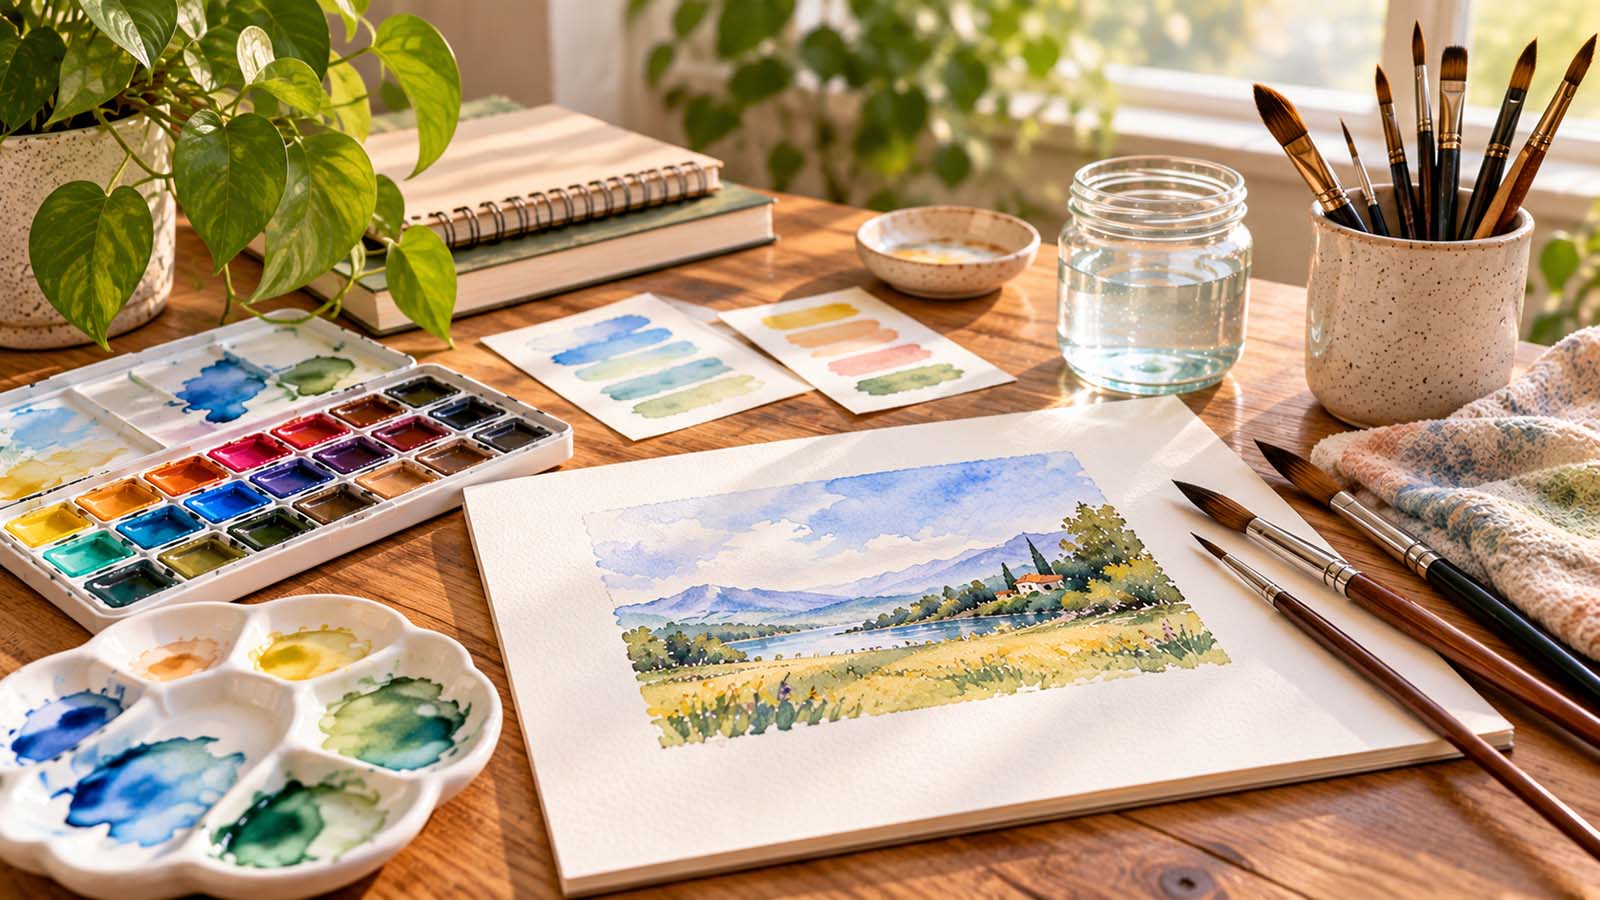
4. Your First Watercolor Painting: A Simple Landscape
Let's make something with the techniques you've just practiced.
A small landscape is a good first project because it doesn't require precise drawing.
We'll paint a soft sky, distant hills, and a few simple foreground details.
Estimated time: 30–45 minutes, depending on drying time.
Step 1: Prepare your paper
Place a small sheet of watercolor paper on a protected table.
If you'd like, secure its edges with painter's tape suitable for your paper. Test the tape first, because some adhesives can tear the surface.
Lightly sketch a horizon line around the lower third of the page.
Add two or three gentle hill shapes.
Keep your pencil marks faint.
Step 2: Paint the sky
Mix a pale blue color with plenty of water.
Lightly dampen the sky area with clean water.
Apply your blue paint near the top and allow it to spread gently.
You can leave small unpainted areas to suggest clouds.
Avoid repeatedly brushing over the same spot.
Let the sky dry before painting the hills.
Step 3: Add distant hills
Mix a muted green, blue-green, or purple.
Paint a soft hill shape along the horizon.
Keep it relatively pale.
Distant objects often look lighter and less detailed than nearby objects, so resist the urge to make this area too dark.
Allow the layer to dry.
Step 4: Paint the foreground
Use a stronger green or earthy mixture for the lower portion of your landscape.
Add a loose wash and let the colors vary slightly.
Don't worry about making the grass look realistic.
A few irregular brushstrokes are enough.
Step 5: Add simple details
Once the earlier layers are dry, use a smaller brush to add a few delicate marks.
You could paint:
Thin grass stems
Small dots suggesting wildflowers
A simple tree silhouette
A winding path
A few darker patches of ground
Choose only one or two details.
Too many can make a peaceful landscape feel crowded.
Step 6: Let it dry and look again
Set the painting aside until it's completely dry.
Then look at it from a little distance.
Notice which areas you like.
Maybe your sky has an interesting texture. Maybe two colors blended beautifully. Maybe one hill looks softer than you expected.
Those small discoveries are part of learning.
5. Common Watercolor Mistakes Beginners Make
Watercolor can be unpredictable, but most early problems have straightforward explanations.
Mistake 1: Using ordinary paper
What happens: The page buckles, tears, or becomes fuzzy.
Try instead: Use watercolor paper that can tolerate repeated moisture.
Mistake 2: Using too much water
What happens: Colors spread farther than expected, and puddles form.
Try instead: Touch your brush lightly against a cloth before painting. Practice noticing the difference between damp paper and paper covered in standing water.
Mistake 3: Mixing too many colors
What happens: Your mixtures become dull or muddy.
Try instead: Begin with two colors at a time. Clean your brush between mixtures when needed.
Mistake 4: Painting over layers before they're dry
What happens: Edges blur unexpectedly, colors bleed, or earlier pigment lifts.
Try instead: Let a layer dry completely before adding controlled details or glazing.
Mistake 5: Trying to fix every brushstroke
What happens: The paper gets overworked and the painting loses its freshness.
Try instead: Make a few deliberate strokes, then stop and observe.
Mistake 6: Comparing your first painting to professional artwork
What happens: You feel discouraged before you've had a chance to learn.
Try instead: Compare your current painting to your previous attempts.
You'll learn more by making ten imperfect paintings than by waiting until you feel ready to make one perfect painting.
6. How to Practice Watercolor Without Feeling Overwhelmed
You don't need a daily two-hour art routine.
In fact, short, relaxed practice sessions may be easier to maintain.
If you're trying to fit creative activities into a busy schedule, read How to Find Time for Hobbies When You're Always Busy.
Here's one simple way to practice.
Your first week of watercolor painting
Day | Activity |
|---|---|
Day 1 | Explore paint and water ratios |
Day 2 | Practice flat and graded washes |
Day 3 | Try wet-on-wet color blending |
Day 4 | Paint simple leaves and petals |
Day 5 | Experiment with layering |
Day 6 | Paint your first small landscape |
Day 7 | Revisit your favorite technique |
You can complete each session in approximately 10–30 minutes, though some projects will take longer if you include drying time.
This isn't a challenge you have to finish on schedule.
Skip a day when you're busy. Repeat an exercise if you enjoy it. Spend an entire afternoon painting if the mood strikes.
The point is to make watercolor something you look forward to, not another task on your list.
7. Easy Watercolor Painting Ideas for Beginners
Once you've tried a simple landscape, you might wonder what to paint next.
Start with subjects that use uncomplicated shapes and don't require precise proportions.
Loose flowers
Paint a few soft petals around a center.
Try daisies, poppies, or imaginary flowers.
Simple leaves
Practice using the shape of your round brush to create leaves with one or two strokes.
Sunset skies
Blend warm yellows, oranges, and pinks.
Experiment with how the colors meet on damp paper.
Mountains
Use layered washes to paint distant mountain silhouettes.
Fruit
Try a lemon, strawberry, or pear.
Simple fruit shapes are useful for exploring color and shadows.
Abstract color studies
Fill a page with overlapping circles, stripes, or washes.
You don't need a recognizable subject to enjoy painting.
Bookmarks
Cut suitable watercolor paper into bookmark-sized pieces and decorate them with small patterns.
Make sure the paint is dry before using or finishing them.
Handmade greeting cards
Paint a small floral motif or seasonal scene on watercolor card stock.
These projects can be enjoyable even when you're still learning.
8. Make Watercolor a Hobby You'll Actually Enjoy
It's easy to turn a new creative interest into a list of things you think you should achieve.
You might feel pressure to improve quickly, buy better materials, complete an online course, or share your work.
None of that is necessary.
Watercolor can simply be something you do because you enjoy the process.
You might paint while listening to music, experiment with colors on a quiet weekend, or keep a small sketchbook for occasional creative breaks.
Some sessions will produce paintings you love.
Others will be messy.
Both are worthwhile.
If you'd like to explore this creative activity further, visit our Watercolour Painting hobby guide for more inspiration and ideas to get started.
If you're still exploring which activities suit your interests, OFFLIVA's Find My Hobby tool can help you discover more possibilities.
And if you'd like another approachable creative activity, you can explore How to Start Sketching as an Adult. Sketching and watercolor can complement each other, but you don't need to learn one before trying the other.
Frequently Asked Questions
Can I learn watercolor painting if I can't draw?
Yes. You can begin with washes, abstract patterns, simple flowers, and loose landscapes. Drawing can be helpful for some subjects, but it isn't a requirement for enjoying watercolor.
What is the easiest thing to paint with watercolors?
Simple leaves, flowers, abstract shapes, sunsets, and small landscapes are good starting points. Choose subjects that don't require precise details.
How many watercolor colors do beginners need?
A small set of around 6–12 colors is usually plenty for a beginner. Learning to mix colors is more valuable than collecting lots of similar shades.
Do I need expensive watercolor paper?
No. Student-grade watercolor paper is suitable for practice. Paper around 300 gsm is a useful starting point, but you don't need premium cotton paper to begin.
How long does it take to learn watercolor painting?
You can start enjoying watercolor in your first session. Developing consistent brush control, color mixing, and layering skills takes practice, and progress varies from person to person.
Should I start with watercolor pans or tubes?
Either can work. Pans are convenient, portable, and tidy, making them a particularly simple option for many beginners.
Why do my watercolor paintings look muddy?
Common causes include mixing too many pigments, working repeatedly into damp layers, or failing to clean your brush between colors. Try simpler mixtures and allow layers to dry when you want clean separation.
Final Thoughts: Start Small and Enjoy the Process
Learning watercolor painting doesn't require a special talent or an expensive collection of art supplies.
You need a few basic materials, a little curiosity, and the willingness to experiment.
Start with simple washes.
Learn how your brush holds water.
Paint a leaf, a flower, or a tiny landscape.
Some of your early attempts will surprise you. Others won't turn out the way you hoped.
That's all part of it.
The best first watercolor painting is the one you actually make.
If you're ready to explore more creative, relaxing, and screen-free activities, Find My Hobby and discover something that fits your everyday life.